
The Best Fluffy Pancakes recipe you will fall in love with. Full of tips and tricks to help you make the best pancakes.
Nothing beats the nostalgic taste of rich, scoopable vanilla ice cream straight from the churn. But if the thought of standing over a hot stove tempering eggs into a custard base sounds like too much work, you are in luck.
This no-cook homemade vanilla ice cream is the ultimate shortcut to gourmet, premium-quality scoops without the stress. It’s thick, ultra-creamy, and packed with beautiful vanilla bean flecks.
The Secret to the Crave-Worthy Texture
Traditional old-fashioned ice cream requires cooking a custard base to get that signature velvety mouthfeel. This recipe bypasses the stove entirely by using pasteurized eggs. They give the ice cream a rich, heavy body that perfectly mimics a cooked custard while keeping the prep time under 10 minutes.
Ingredients You’ll Need
This recipe yields about 2.5 to 3 quarts of ice cream. If you are using a standard 2-quart ice cream maker (like a Cuisinart), simply cut the ingredients in half, or churn it in two separate batches!
3 Large Pasteurized Eggs: (Brought to room temperature). Essential for safety and that signature gourmet richness.
4 Cups Half-and-Half: Gives the base the perfect balanced texture (avoid fat-free here!).
4 Cups Heavy Whipping Cream: For that signature, decadent creaminess.
¾ Cup All-Natural Cane Sugar: Or standard granulated white sugar.
¾ Cup Light Brown Sugar: (Packed). The molasses undertone adds an incredible depth of flavor.
1 Tablespoon Vanilla Bean Paste: Worth it for those gorgeous gourmet flecks.
2 Tablespoons Pure Vanilla Extract: Because real vanilla makes all the difference.
1 Teaspoon Salt: To balance the sweetness and make the vanilla pop.
Step-by-Step Instructions
1. Whip the Base
In the bowl of a stand mixer fitted with the whisk attachment (or using a hand mixer), beat the pasteurized eggs on medium-high speed until they are light, creamy, and frothy.
2. Dissolve the Sugars
Slowly pour in both the cane sugar and light brown sugar. Continue mixing on medium-high for 3 to 4 minutes until the sugars are completely dissolved and the mixture is smooth.
3. Add the Dairy & Vanilla
Turn the mixer down to low and pour in the half-and-half, heavy whipping cream, pure vanilla extract, vanilla bean paste, and salt. Mix just until combined and uniform.
4. Let the Flavors Marry
Pop the mixing bowl into the refrigerator for 15 to 30 minutes. Letting the batter chill allows the sugars to fully settle and gives the vanilla time to infuse into the cream.
5. Churn to Perfection
Pour the chilled mixture into your ice cream maker (only fill it about 2/3 full, as it will expand). Churn according to your manufacturer’s instructions. It typically takes about 20 to 30 minutes to reach a thick, soft-serve consistency.
Fun Flavor Variations (Mix-ins)
Want to upgrade your vanilla base? Stir these in during the last 5 minutes of churning:
Fudge or Caramel Ripple: Layer the soft ice cream into your storage container, swirling in ribbons of hot fudge or salted caramel as you go.
Cookie Dough Dynamics: Fold in mini chocolate chips and chunks of eggless edible cookie dough.
Cookies & Cream: Crush up 10–12 Oreos and let the machine mix them in right before it finishes churning.
Pro-Tips for Perfect Freezing & Storage
The Parchment Paper Trick: To prevent those pesky ice crystals and freezer burn, press a piece of parchment paper or plastic wrap directly onto the surface of the ice cream before sealing the airtight container.
The Best Containers: Use a shallow, wide container or a classic loaf pan. It helps the ice cream freeze evenly and makes creating beautiful, clean scoops much easier.
The 10-Minute Thaw: Homemade ice cream freezes firmer than store-bought brands. Let your container sit on the counter at room temperature for 5 to 10 minutes before diving in with your scoop.
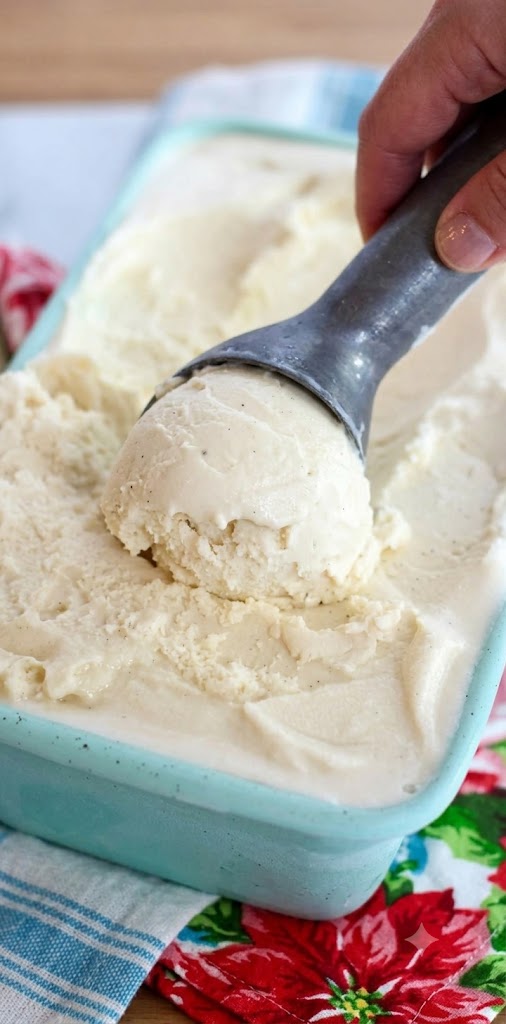
10-Minute Prep No-Cook Vanilla Ice Cream (Gourmet Creamery Style)
Skip the stove and the tedious custard-making! With just 10 minutes of active prep, this old-fashioned vanilla ice cream relies on a brilliant no-cook base that delivers the thickest, creamiest, and most luxurious premium scoops right from your churn.
Ingredients
Method
- In a stand mixer fitted with the whisk attachment, beat the pasteurized eggs on medium-high speed until light, creamy, and frothy.
- Slowly pour in the cane sugar and light brown sugar. Beat on medium-high for 3 to 4 minutes until the sugars are completely dissolved and the texture is smooth.
- Lower the mixer speed and pour in the half-and-half, heavy whipping cream, pure vanilla extract, vanilla bean paste, and salt. Mix just until combined.
- Place the mixture in the refrigerator for 15 to 30 minutes to chill and allow the flavors to marry perfectly.
- Pour the chilled liquid into your ice cream maker (fill up to 2/3 full). Churn according to the manufacturer's instructions for 20 to 30 minutes until it reaches a thick, soft-serve consistency.
Notes
Pro-Tip for Storage: To prevent ice crystals, press a piece of parchment paper or plastic wrap directly onto the surface of the ice cream before sealing the airtight container.
Serving Note: Homemade ice cream freezes firmer than commercial brands. Let it thaw on the counter for 5–10 minutes before scooping for that perfect, effortless glide.


[…] rich red velvet cake pairs wonderfully with a scoop of 10-Minute Prep No-Cook Vanilla Ice Cream or a warm slice of The Absolute Best Banana Bread Recipe. For a complete party dessert table, […]
[…] 10-Minute Prep No-Cook Vanilla Ice Cream (Gourmet Creamery Style) […]
[…] Vanilla Ice Cream: Swap or combine the whipped cream with a scoop of creamy 10-Minute Prep No-Cook Vanilla Ice Cream for an extra indulgent […]